Development of a High-End Phono Preamp

Isolation milling improves the playback of vinyl records. 

Despite the dominance of digitally recordings, sales of vinyl records are making a comeback and have steadily risen over the last 15 years. However, enjoying vinyl isn’t as simple as plugging a turntable into a sound system. That’s because the analog signal needs significant amplification, which it gets from an audio device known as a phono preamplifier (“phono preamp,” for short).


And thanks to the state-of-the-art LPKF ProtoMatS64 circuit board plotter, phono preamp manufacturers can dramatically shorten production time, putting perfectly tuned music in the ears of vinyl record fans even sooner.


In order to transfer an analog signal to a vinyl surface, it must be cut first into a copper matrix from which the vinyl records are pressed. The matrix is cut non-linearly over the frequency using a Record Industry Association of America (RIAA) equalization curve. When users play the vinyl record, the phono preamp reverts the RIAA equalization curve from the turntable back to the shape it was on the original recording, the so-called “playback curve.”

The central microcontroller board

Turntables operate with either moving coil (MC) or moving magnet (MM) cartridges. Selecting different inputs for MM and MC cartridges, connecting a terminating resistor and/or capacitor, and setting the appropriate gain is done via a microcontroller board inside the phono preamp itself. A team around Professor Francesco Volpe of the University of Aschaffenburg in Germany took on this challenge to design and produce a microcontroller-based phone preamp using their PCB prototyping system entirely in-house.

Chemical-free milling process

In this case study, operators used the LPKF ProtoMat S64 to mill the microcontroller’s double-sided circuit board layout without using any etching chemicals. Operators processed the substrate almost entirely automatically using the system’s automated tool changes, camera-controlled fiducial recognition, and integrated milling width control.


For through-hole plating, operators coated the circuit board with ProConduct paste, then drilled holes through a protective film. With the help of a squeegee and a vacuum table, they pulled the conductive paste through the holes, allowing it to cure in an oven. They then removed the protective film.

Finished PCB in less than an hour

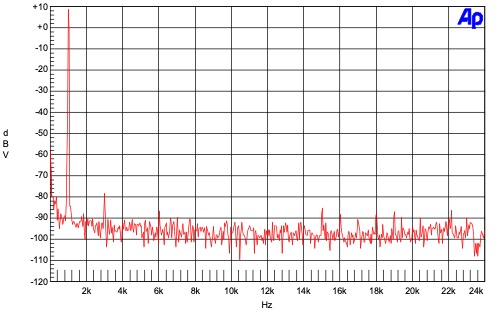
With the combination of the LPKF ProtoMat S64 and ProConduct paste, less than an hour transpired between the final PCB layout and the produced PCB. Once the phono preamp was built, engineers successfully carried out detailed signal measurements with spectacular results.


Development of a High-End Phono Preamp

Read the full case study here.

Precision PCB Prototyping

The LPKF ProtoMatS64’s chemical-free process allows engineers to produce through-plated PCBs in a micro-computer lab without special chemical precautions. The accuracy of the ProtoMat S64 enables the creation of small, precise structures required for modern fine pitch components.

Best performance with ProtoLaser ST

While contactless PCB production using a laser reduces the number of tools and steps required, price has often been a barrier for LPKF ProtoMat owners—until now.

Last year, LPKF introduced the first affordable tabletop laser system with the same dimensions as the ProtoMat. This new plug-and-play system features easy-to-use software, rich material libraries and design updates based on customer feedback. Not only does the laser eliminate the need for carbide surface milling tools, insulation channels can now shrink below 100 µm. But once you have a laser, what should you do with your existing ProtoMat? Let’s take a deeper look at double-sided sample production using the new LPKF ProtoLaser ST.

The Sample

For this sample, we will utilize a 32-bit, 80 x 100mm (approx. 3” x 4”) ARM Cortex microcontroller environment, double-sided board with 304 holes and vias. Because this board requires a solder mask, we start by importing CAD data into an existing LPKF CircuitPro for ProtoMat. We still need the ProtoMat for drilling and routing, as the ProtoLaser ST isn’t ideal for drilling FR4.

Drilling

For this application, we are using a ProtoMat S104 hi-end milling system. Drilling a single sample takes 13 minutes, including fiducial, vias, and through-hole components as well as mounting holes. However, usually both samples can be drilled in a single process.

Plating

The through hole plating step is pretty straight forward using the LPKF Contac S4. With a target of 17 µm added copper, the initial cleaning and treatment run practically by themselves. Once the through-holes are complete, our copper-plated panel is ready for the ProtoLaser ST. The CircuitPro 2019 software will recognize file specifications and preset filters for double-sided boards.

Laser Processing

For our material, we will use an FR4 with 18 µm Cu on each side. The software will run the calculations of the scan fields and tool paths all in one move. The data prep requires approximately five minutes. Processing the bottom side of the board with direct laser etching takes 21 minutes, and the top side 19 minutes after manual flipping. When using LPKF ProMask for the solder mask in conjunction with a ProtoLaser, you can omit some of the usual process steps. The polymer should still be applied to the board and cured by UV light; however, the laser will remove the solder resist from the pads with superior precision.


For routing the board outline to separate the PCB from the panel, transfer the PCB back to the ProtoMat, using the same fiducials to align the board and perform a perimeter cut-out. The ProtoLaser ST provides existing LPKF prototyping customers an excellent opportunity to reduce pitch below 100/100 µm, while increasing process speed. The sample with 35 µm (1oz) Cu was produced in a less than half of the time of the flagship milling system, the ProtoMat S104.


Read the entire, detailed report here.